I passed exam 70-341 today, second time of trying so glad to get this out of the way.
Next up is 70-342 Advanced Solutions of Microsoft Exchange Server 2013 for my MCSE Messaging...

Thursday, 4 December 2014
Wednesday, 26 November 2014
On-Premises Legacy Public Folder
There are some new recommendations around Legacy Public Folder configuration in Exchange 2013. These settings were introduced in Exchange 2013 Cumulative Update (CU) 5.
The recommendation is to make these configuration changes prior to installing CU7 (When it's released…), the recommendation may impact your update depending on legacy version of Exchange see flow diagram below.
Quick guide steps are:
http://blogs.technet.com/b/exchange/archive/2014/11/07/on-premises-legacy-public-folder-coexistence-for-exchange-2013-cumulative-update-7-and-beyond.aspx
http://technet.microsoft.com/en-us/library/dn249373(v=exchg.150).aspx

Disclaimer: All scripts and other PowerShell references on this blog are offered "as is" with no warranty. While these scripts are tested and working in my test environment, it is recommended that you test these scripts in your own test environment before using in any production environment.
The recommendation is to make these configuration changes prior to installing CU7 (When it's released…), the recommendation may impact your update depending on legacy version of Exchange see flow diagram below.
Quick guide steps are:
- Legacy Version of Exchange
- If Exchange 2007
- Add new Mailbox Database on same server as Public Folder Database
- If Exchange 2010
- Ensure server hosting Public Folder database has the Client Access Role installed
- Add new Mailbox Database on same server as Public Folder Database
- Create a new "Proxy Mailbox" on the database created
- Update Exchange 2013 configuration
- Set-OrganizationConfig -PublicFoldersEnabled Remote
- Set-OrganizationConfig -RemotePublicFolderMailboxes "ProxyMailbox1","ProxyMailbox2","ProxyMailbox3"
http://blogs.technet.com/b/exchange/archive/2014/11/07/on-premises-legacy-public-folder-coexistence-for-exchange-2013-cumulative-update-7-and-beyond.aspx
http://technet.microsoft.com/en-us/library/dn249373(v=exchg.150).aspx

Disclaimer: All scripts and other PowerShell references on this blog are offered "as is" with no warranty. While these scripts are tested and working in my test environment, it is recommended that you test these scripts in your own test environment before using in any production environment.
Sunday, 16 November 2014
Exchange 2013 Upgrade in a Child Domain
Recently working on an Exchange 2013 upgrade project where the forest had both a Root and Child domain, I came across a couple of points that I thought would be worth noting for future reference.
On Exchange projects you make the necessary Request for Change (RFC), to enable the upgrade of the Active Directory (AD) Forest and Domains, and the installation of Exchange 2013. Sometimes I come across where the client wants to prepare the AD Forest and Domains separate from the Exchange installation, to allow for the schema upgrade to replicate. In these scenarios you find that the groups "Schema Admins", "Enterprise Admins" and "Domain Admins" are more tightly controlled (As they should be…) not to allow inappropriate or temporary accounts in these groups just for installation.
The necessary Exchange binary files and commands for the Schema and Domain extension were passed to the AD team.
These commands prepared the Schema and Domains for Exchange 2013 installation, as these commands were run by another team and wasn't visible to myself I double checked the Schema objects.
Note: You need to add the "Exchange Organisation" name on the '$ForestObjectVersion' line, this will return three numbers on the Root Domain and only the '$DomainObjectVersion' on the Child Domain.
Forest:

Child Domain:

Exchange 2013 Schema and Domain Versions:
This confirmed the Schema and Domains had successfully been prepared. The next stage was to install the first Exchange 2013 server into the infrastructure, I misinterpreted the requirements to install the first Exchange 2013 server…
From TechNet (Exchange 2013): - http://technet.microsoft.com/en-us/library/bb124778(v=exchg.150).aspx
From TechNet (Exchange 2010):- http://technet.microsoft.com/en-us/library/bb124778(v=exchg.141).aspx
I was a member of the Child Domains "Domain Admins" and a member of "Organization Management" and stated to install the first Exchange 2013 server, strangely enough as much as the setup process has improved over the years and warning when a step or prerequisite has been missed, or not in the correct groups etc. The setup did not pick up that I wasn't a member of "Enterprise Admin" and that this was the first Exchange 2013 server being installed. If this was Exchange 2010 installation all would have be ok, but as this was an Exchange 2013 installation there is the extra requirement of "If you're installing the first Exchange 2013 server in the organization, the account you use must have membership in the Enterprise Admins group". Needless to say the Exchange 2013 installed failed at (Step 8 I think) the reason being I was not a member of "Enterprise Admins".
My account was added to the "Enterprise Admins" group and setup was rerun to complete the installation of the server.
Exchange RBAC Groups and Arbitration Mailboxes…

Just to finish a quick note about the Roll Based Access Control groups (RBAC), these groups are used to help manage Exchange. In a Root and Child Domain deployment, these groups will be in the Root Domain in the AD forest. The Arbitration and Discovery mailboxes will also be in the Root domain even if the Exchange servers are only installed in the child domain. As discovered when I wanted to move these too highly available mailbox. When I ran the follow command:

The Exchange Management Shell (EMS) returns no mailboxes??? We all know they are there, so why are they not showing in the EMS? The reason is by default is the EMS session will have an AD scope set to the domain you're logged into. To change the AD scope run the follow command:

And then retry the previous command again:

I hope this helps someone in the future and saves them some time.
Disclaimer: All scripts and other PowerShell references on this blog are offered "as is" with no warranty. While these scripts are tested and working in my test environment, it is recommended that you test these scripts in your own test environment before using in any production environment.
On Exchange projects you make the necessary Request for Change (RFC), to enable the upgrade of the Active Directory (AD) Forest and Domains, and the installation of Exchange 2013. Sometimes I come across where the client wants to prepare the AD Forest and Domains separate from the Exchange installation, to allow for the schema upgrade to replicate. In these scenarios you find that the groups "Schema Admins", "Enterprise Admins" and "Domain Admins" are more tightly controlled (As they should be…) not to allow inappropriate or temporary accounts in these groups just for installation.
The necessary Exchange binary files and commands for the Schema and Domain extension were passed to the AD team.
- Setup.exe /PrepareSchema /IAcceptExchangeServerLicenseTerms
- Setup.exe /PrepareAD /IAcceptExchangeServerLicenseTerms
- Setup.exe /PrepareAllDomains /IAcceptExchangeServerLicenseTerms
These commands prepared the Schema and Domains for Exchange 2013 installation, as these commands were run by another team and wasn't visible to myself I double checked the Schema objects.
$RootDSE = ([ADSI]"").distinguishedName
$ForestRangeUpper = ([ADSI]"LDAP://CN=ms-Exch-Schema-Version-Pt,CN=Schema,CN=Configuration,$RootDSE").rangeUpper
$ForestObjectVersion = ([ADSI]"LDAP://cn=<ExhangeOrg>,cn=Microsoft Exchange,cn=Services,cn=Configuration,$RootDSE").objectVersion
$DomainObjectVersion = ([ADSI]"LDAP://CN=Microsoft Exchange System Objects,$RootDSE").objectVersion
$DisplayVersions = @()
$DisplayVersions += "Exchange Forest (rangeUpper) = " + "$ForestRangeUpper"
$DisplayVersions += "Exchange Forest (ObjectVersion) = " + "$ForestObjectVersion"
$DisplayVersions += "Domain (ObjectVersion) = " + "$DomainObjectVersion"
$DisplayVersions
Note: You need to add the "Exchange Organisation" name on the '$ForestObjectVersion' line, this will return three numbers on the Root Domain and only the '$DomainObjectVersion' on the Child Domain.
Forest:
Child Domain:
Exchange 2013 Schema and Domain Versions:
| Exchange | Forest (rangeUpper) | Forest (objectVersion) | Domain (objectVersion) |
| 2013 RTM | 15137 | 15449 | 13236 |
| 2013 CU1 | 15254 | 15614 | 13236 |
| 2013 CU2 | 15281 | 15688 | 13236 |
| 2013 CU3 | 15283 | 15763 | 13236 |
| 2013 SP1 | 15292 | 15844 | 13236 |
| 2013 CU5 | 15300 | 15870 | 13236 |
| 2013 CU6 | 15303 | 15965 | 13236 |
This confirmed the Schema and Domains had successfully been prepared. The next stage was to install the first Exchange 2013 server into the infrastructure, I misinterpreted the requirements to install the first Exchange 2013 server…
From TechNet (Exchange 2013): - http://technet.microsoft.com/en-us/library/bb124778(v=exchg.150).aspx
- You must ensure the account you use is delegated membership in the Schema Admins group if you haven't previously prepared the Active Directory schema. If you're installing the first Exchange 2013 server in the organization, the account you use must have membership in the Enterprise Admins group. If you've already prepared the schema and aren't installing the first Exchange 2013 server in the organization, the account you use must be a member of the Exchange 2013 Organization Management role group.
From TechNet (Exchange 2010):- http://technet.microsoft.com/en-us/library/bb124778(v=exchg.141).aspx
- If you're installing the first Exchange 2010 server in the organization, and the Active Directory preparation steps have not been performed, the account you use must have membership in the Enterprise Administrators group. If you haven't previously prepared the Active Directory schema, the account must also be a member of the Schema Admins group. For more information about preparing Active Directory for Exchange 2010, see Prepare Active Directory and Domains. If you have already performed the schema and Active Directory preparation steps, the account you use must be a member of the Delegated Setup management role group or the Organization Management role group.
I was a member of the Child Domains "Domain Admins" and a member of "Organization Management" and stated to install the first Exchange 2013 server, strangely enough as much as the setup process has improved over the years and warning when a step or prerequisite has been missed, or not in the correct groups etc. The setup did not pick up that I wasn't a member of "Enterprise Admin" and that this was the first Exchange 2013 server being installed. If this was Exchange 2010 installation all would have be ok, but as this was an Exchange 2013 installation there is the extra requirement of "If you're installing the first Exchange 2013 server in the organization, the account you use must have membership in the Enterprise Admins group". Needless to say the Exchange 2013 installed failed at (Step 8 I think) the reason being I was not a member of "Enterprise Admins".
My account was added to the "Enterprise Admins" group and setup was rerun to complete the installation of the server.
Exchange RBAC Groups and Arbitration Mailboxes…
Just to finish a quick note about the Roll Based Access Control groups (RBAC), these groups are used to help manage Exchange. In a Root and Child Domain deployment, these groups will be in the Root Domain in the AD forest. The Arbitration and Discovery mailboxes will also be in the Root domain even if the Exchange servers are only installed in the child domain. As discovered when I wanted to move these too highly available mailbox. When I ran the follow command:
- Get-Mailbox –Arbitration
The Exchange Management Shell (EMS) returns no mailboxes??? We all know they are there, so why are they not showing in the EMS? The reason is by default is the EMS session will have an AD scope set to the domain you're logged into. To change the AD scope run the follow command:
- Set-ADServerSettings –ViewEntireForest:$true
And then retry the previous command again:
- Get-Mailbox –Arbitration
I hope this helps someone in the future and saves them some time.
Disclaimer: All scripts and other PowerShell references on this blog are offered "as is" with no warranty. While these scripts are tested and working in my test environment, it is recommended that you test these scripts in your own test environment before using in any production environment.
Friday, 3 October 2014
Exchange High Availability with Kemp Load Balancer…
Working recently on an Exchange 2010 deployment I was doing end to end testing with the environment before it went into pilot phase, all was working well till I failed one of the server nodes in the DAG, I noticed the Outlook client would freeze… The Kemp VLM was downloaded from the website, and I'd used the Exchange 2010 ESP template. So what was wrong?
What was wrong was I didn't follow the deployment guide like I'd previously done when I didn't use the Exchange template, the template had made me lazy as it does all the hard work for you. But there are some basic settings that need to be changed on the load balancer so that the load balancer will function correctly.
In my case I hadn't change "Drop Connections on Real Server Failure", this is a very quick change on the Web User Interface (WUI), from the Kemp deployment guide:

Figure 1: L7 Configuration
So always make sure that you read the deployment guide and apply the settings required even if the templates do all the hard work for you…
Kemp Exchange 2010 Deployment Guide - https://support.kemptechnologies.com/hc/en-us/articles/201737917-Exchange-2010
What was wrong was I didn't follow the deployment guide like I'd previously done when I didn't use the Exchange template, the template had made me lazy as it does all the hard work for you. But there are some basic settings that need to be changed on the load balancer so that the load balancer will function correctly.
In my case I hadn't change "Drop Connections on Real Server Failure", this is a very quick change on the Web User Interface (WUI), from the Kemp deployment guide:
By default existing connections are not closed if a Real Server fails. This can lead to issues with Outlook clients if an Exchange CAS server fails. A solution to this is to enable the Drop Connections on RS Failure option which can be found on the System Configuration > Miscellaneous > L7 Configuration screen in the WUI.
When this option is enabled, LoadMaster tracks all the incoming connections and which Real Servers they are connected to. When a Real Server fails, all connections to the Real Server are immediately dropped, forcing the connections to reconnect to a different Real Server.
Enabling this option has the added benefit of allowing relatively higher Idle Connection Timeout values to be set as the danger of the client retaining a connection to a failed server is removed.
Figure 1: L7 Configuration
So always make sure that you read the deployment guide and apply the settings required even if the templates do all the hard work for you…
Kemp Exchange 2010 Deployment Guide - https://support.kemptechnologies.com/hc/en-us/articles/201737917-Exchange-2010
Sunday, 7 September 2014
Exchange 2013/2010/2007 Updates…
This is delayed post as I've been offline due to operation on my knee. On the 26th August 2014 The Exchange Team announced updated to Exchange 2013, 2010 and 2007.
- Exchange 2013 CU6 - Article Knowledge Base
- Exchange 2010 SP3 RU7 - Article Knowledge Base
- Exchange 2007 SP3 RU14 - Article Knowledge Base
Exchange 2007 SP3 RU14:
This update includes new daylight saving time (DST) updates for Exchange Server 2007 SP3.Exchange 2010 SP3 RU7:
Update Rollup 7 for Exchange Server 2010 SP3 resolves the issues that are described in the following Microsoft Knowledge Base (KB) articles:- 2983261 "HTTP 400 - Bad Request" error when you open a shared mailbox in Outlook Web App in an Exchange Server 2010 environment
- 2982873 Outlook Web App logon times out in an Exchange Server 2010 environment
- 2980300 Event 4999 is logged when the World Wide Web publishing service crashes after you install Exchange Server 2010 SP3
- 2979253 Email messages that contain invalid control characters cannot be retrieved by an EWS-based application
- 2978645 S/MIME option disappears when you use Outlook Web App in Internet Explorer 11 in an Exchange Server 2010 environment
- 2977410 Email attachments are not visible in Outlook or other MAPI clients in an Exchange Server 2010 environment
- 2976887 eDiscovery search fails if an on-premises Exchange Server 2010 mailbox has an Exchange Online archive mailbox
- 2976322 Assistant stops processing new requests when Events in Queue value exceeds 500 in Exchange Server 2010
- 2975988 S/MIME certificates with EKU Any Purpose (2.5.29.37.0) are not included in OAB in Exchange Server 2010
- 2966923 Domain controller is overloaded after you change Active Directory configurations in Exchange Server 2010
Exchange 2013 CU6:
This update resolves the issues that are described in the following Microsoft Knowledge Base (KB) articles:- 2991934 Duplicate mailbox folders after migration to Exchange Server 2013
- 2988229 Hybrid Configuration wizard error "Subtask CheckPrereqs execution failed" for Exchange Server 2013
- 2986779 EMS takes a long time to execute the first command in an Exchange Server 2013 Cumulative Update 5 environment
- 2983512 RPC Client Access service crashes on an on-premises Mailbox server in an Exchange Server 2013 hybrid environment
- 2983426 AutodiscoverSelfTestProbe fails when external URL is not set for EWS virtual directory in Exchange Server 2013
- 2983423 AutodiscoverSelfTestProbe fails when external URL is not set for ECP virtual directory in Exchange Server 2013
- 2983422 The ServerWideOffline component is set to Inactive after Exchange Server 2013 prerequisite check fails
- 2983207 "532 5.3.2" NDR when you send an email message to a hidden mailbox in an Exchange Server 2013 environment
- 2983066 Removed Default or Anonymous permission for Outlook folders cannot be restored in an Exchange Server 2013 environment
- 2982769 "Topology service cannot find the OWA service" when you perform an eDiscovery search in Exchange Server 2013
- 2982763 Mail-enabled public folder accepts email messages from unauthorized users in an Exchange Server 2013 environment
- 2982762 OAB generation arbitration mailbox can be removed or disabled in an Exchange Server 2013 environment
- 2982760 The Enter key submits duplicate sign-in forms to Outlook Web App in an Exchange Server 2013 environment
- 2982759 You cannot access the archive mailbox of a delegated user after enabling MAPI over HTTP
- 2982017 Incorrect voice mail message duration in an Exchange Server 2013 environment
- 2981835 You cannot add attachments, delete or move many email messages in bulk in Outlook Web App
- 2981466 MAPI/CDO client cannot connect to Exchange Server 2013
- 2977279 You cannot disable journaling for protected voice mail in an Exchange Server 2013 environment
- 2975599 Exchange Server 2010 public folder replication fails in an Exchange Server 2013 environment
- 2975003 Calendar item body disappears in Outlook online mode in an Exchange Server 2013 environment
- 2974339 OAB generation fails if FIPS is used in an Exchange Server 2013 environment
- 2971270 Blank page after you sign in to Exchange Server 2013 EAC (formerly ECP)
- 2970040 Folder Assistant rule does not work correctly in an Exchange Server 2013 environment
- 2965689 EAS device cannot sync free/busy status if an item is created by EWS in an Exchange Server 2013 environment
- 2963590 Message routing latency if IPv6 is enabled in Exchange Server 2013
- 2961715 "Something went wrong" error in Outlook Web App may show an incorrect date
- 2958434 Users cannot access mailboxes in OWA or EAS when mailbox database is removed
Important Note:
The Exchange Team have discovered an issue with the latest Exchange 2013 Cumulative Update 6, a knowledge base article has been posted with information KB2997209, also another knowledge base article with a script to fix issue KB2997355
Also see Michael de Rooji's blog post about an alternative to the knowledge base script Blog Post
Now it's time to go test in my home lab…
Sunday, 8 June 2014
Kemp – Hyper-V 2012\Windows 8 Deployment
This is a step-by-step guide to deploying a Kemp Virtual LoadMaster (VLM) on a Hyper-V 2012 or Windows 8 installation. This guide was put together using the Kemp documentation.
Kemp Software Version: 7.1-16(Hyper-V)
VLM Requirements:
- 2 x virtual processors
- 1 Gb RAM
- 32 GB Virtual hard disk capacity
VLM Download
Download the VLM from Kemp Download Link (52 Mb), once download is complete you will need to extract the content from the compressed folder. For this guide I extracted the files to "D:\Virtual Machines\LoadMaster VLM"Importing the VLM
To import the VLM follow these instructions.- Open the Hyper-V Manager and select Import Virtual Machine… from the Action Pane

- Click Next >

- Click Browse… button and select the folder you extracted the downloaded file too.
- Click Next >

- Select the VLM, and click Next >

- Select the Copy the virtual machine (create a new unique ID) option.
- Click Next >

- You can change the virtual machine location, or use the Hyper-V server defaults
- Click Next >

- Click Browse… to select the location of the virtual hard disk
- Click Next >

- Click Finish, and let the VLM import to your Hyper-V server


VLM Network Adapter Settings
Before the starting the VLM the network settings must be checked on the Hyper-V guest.- Right-click the virtual machine in the Virtual Machines pane
- Click Settings… option
- Click on the Network Adapter option within the Hardware list
- Ensure that the network adapter is connected to the correct Hyper-V virtual network

- Expand the Network Adapter, select the Advanced Features and select Static in the MAC Address
- Ensure that the Enable MAC address spoofing is checked

- Click OK button
- Repeat these steps for the second network adapter


Start VLM and License
Once the VLM has been imported and the network settings have been checked you start the VLM from the Hyper-V console.- Right-Click the Virtual Machine in the Virtual Machines pane
- Click Start
- Right-click the VLM and select Connect to open the console window

- The VLM should get an IP from DHCP, browse to that address via a web browser
- You receive a certificate warning:
Internet Explorer:-
Google Chrome:
- Click Continue to this website (not recommend) or Proceed anyway (Depending on web browser)
- The Root certificate can be downloaded\installed later
- The LoadMaster End User License Agreement screen appears. Please read the license agreement and, if willing to accept the conditions therein, click Agree button to proceed
- The LoadMaster will then ask if you are OK with the LoadMaster regularly contacting Kemp to check for updates and other information
- Click the relevant button to proceed

- Before the VLM can be used it needs to be licensed, this can be done either Online or Offline
- Both methods require a Kemp ID, to register complete registration form
- You will then be prompted to login to the VLM

- Enter Username bal and Password 1fourall, the VLM will ask you set a new default password

- Enter new password and click Set Password

- You will be prompted to login into the VLM again, this time with your new password


Kemp Software Version: 7.1-16(Hyper-V)
Wednesday, 28 May 2014
Exchange 2013 & 2010 Updates
The Exchange Team have announced Exchange 2013 CU5 and Exchange 2010 SP3 RU6 is now available for download.
Exchange 2013 CU5 – KB2936880
Issues that the cumulative update resolves
This update resolves the issues that are described in the following Microsoft Knowledge Base (KB) articles:- 2963590 Message routing latency if IPv6 is enabled in Exchange Server 2013
- 2963566 Outlook Web App accessibility improvement for UI appearance in Exchange Server 2013
- 2962439 You cannot sync contacts or tasks in Microsoft CRM client for Outlook in an Exchange Server 2013 environment
- 2962435 CRM synchronization fails if the time zone name of a meeting is not set in an Exchange Server 2013 environment
- 2962434 Slow performance in Outlook Web App when Lync is integrated with Exchange Server 2013
- 2958430 "Some or all Identity references could not be translated" error when you manage DAG in Exchange Server 2013 SP1 in a disjoint namespace domain
- 2957592 IME is disabled in Outlook Web App when you press Tab to move the focus in an email message in Exchange Server 2013
- 2942609 Exchange ActiveSync proxy does not work from Exchange Server 2013 to Exchange Server 2007
- 2941221 EWS integration for Lync works incorrectly in an Exchange Server 2013 and 2007 coexistence environment
- 2926742 Plain-text message body is cleared when writing in Outlook Web App by using Internet Explorer 8 in Exchange Server 2013
- 2926308 Sender's email address is broken after importing a PST file into an Exchange Server 2013 mailbox
- 2925559 Users always get the FBA page when they access OWA or ECP in Exchange Server 2013
- 2924519 "SyncHealth\Hub" folder is created unexpectedly after installing Cumulative Update 2 for Exchange Server 2013
- 2916113 Cannot open .tif files from email messages by using Windows-based applications in an Exchange Server 2013 environment
- 2592398 Email messages in the Sent Items folder have the same PR_INTERNET_MESSAGE_ID property in an Exchange Server 2010 environment
Exchange 2010 SP3 RU6 – KB2936871
Issues that the rollup update resolves
Update Rollup 6 for Exchange Server 2010 SP3 resolves the issues that are described in the following Microsoft Knowledge Base (KB) articles:
- 2960652 Organizer name and meeting status field can be changed by EAS clients in an Exchange Server 2010 environment
- 2957762 "A folder with same name already exists" error when you rename an Outlook folder in an Exchange Server 2010 environment
- 2952799 Event ID 2084 occurs and Exchange server loses connection to the domain controllers in an Exchange Server 2010 environment
- 2934091 Event ID 1000 and 7031 when users cannot connect to mailboxes in an Exchange Server 2010 environment
- 2932402 Cannot move a mailbox after you install Exchange Server 2010 SP3 RU3 (KB2891587)
- 2931842 EWS cannot identify the attachment in an Exchange Server 2010 environment
- 2928703 Retention policy is applied unexpectedly to a folder when Outlook rule moves a copy in Exchange Server 2010
- 2927265 Get-Message cmdlet does not respect the defined write scope in Exchange Server 2010
- 2925273 Folder views are not updated when you arrange by categories in Outlook after you apply Exchange Server 2010 Service Pack 3 Update Rollup 3 or Update Rollup 4
- 2924592 Exchange RPC Client Access service freezes when you open an attached file in Outlook Online mode in Exchange Server 2010
- 2923865 Cannot connect to Exchange Server 2010 when the RPC Client Access service crashes
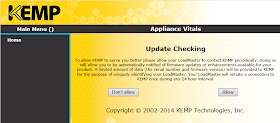
Thursday, 1 May 2014
_1480.png)
.png)
Tuesday, 1 April 2014
New Accepted Domain and Email Address Policy.
I recently worked on a Exchange deployment where the business wanted to add a new Accepted Domain, update the E-mail Address Policy so the new domain was their primary SMTP address on all mailboxes.
So in good practice I thought I’d test before apply to every mailbox in the organisation, I identified a test mailbox called “User A” and added a custom attribute of “NewDomain”, Created a copy of the original policy filtered with the new custom attribute and applied the policy.

On checking the mailbox I found the new E-Mail hadn’t been applied, this was because the “Automatic update e-mail address based on e-mail policy” had been unchecked.
So i thought I needed to Identity which other mailboxes have been removed from the policy, by using PowerShell I was quickly able to establish this:
## Get Mailboxes where EAP isn't enabled
$Mailbox = Get-Mailbox | Where {$_.EmailAddressPolicyEnabled -like "False"}
Using the $Mailbox collection I could quickly identify how many mailboxes had been removed:
## Get Mailboxes count
$Mailbox.count
Using the collection I could then put back into the policy using the following:
## Update Mailbox to be in the EAP
ForEach ($ObjItem in $Mailbox)
{
Set-Mailbox $ObjItem.identity -EmailAddressPolicyEnabled $true
}
This will check the “Automatic update e-mail address based on e-mail policy” that had been unchecked.
The above was my working out the solution to re-enable the policy on mailboxes, however this could create large collections on the computer because as you’ll see from from my PowerShell I was getting the mailboxes and running a Where on the collection. The more efficient way is to use the –Filter, on the initial Get-Mailbox:
Get-Mailbox -Filter {EmailAddressPolicyEnabled -eq $False}
If your happy to process all at the same time the PowerShell can be simplified to a single line:
Get-Mailbox -Filter {EmailAddressPolicyEnabled -eq $False} | ForEach {Set-Mailbox $_ -EmailAddressPolicyEnabled $True}
Disclaimer: All scripts and other PowerShell references on this blog are offered "as is" with no warranty. While these scripts are tested and working in my test environment, it is recommended that you test these scripts in your own test environment before using in any production environment.
Thursday, 27 February 2014
Exchange 2013 Service Pack 1
The Exchange Team have announced Exchange 2013 SP1 is now available for download! - Exchange Team Blog
The service pack includes the following enhancements:
- DLP Policy Tips for Outlook Web App
- S/MIME support for Outlook Web App
- Windows 2012 R2 Support for Exchange 2013 SP1
- Exchange Admin Center Cmdlet logging
- Edge Transport server role
- SSL Offloading
- Enhanced text editor for Outlook Web App
- Plus many more…
As with previous CUs, SP1 is a full build of Exchange 2013, prior to upgrading or deploy SP1 onto a server, you must update Active Directory!!!
The final build number for Exchange 2013 SP1 is 15.00.0547.032, a full description of the service pack is here – KB2926248
Microsoft Exchange Server 2013 Service Pack 1 (SP1) - Download
the Exchange Team also announced updates for older versions of Exchange
Exchange 2010 SP3 RU5:
Description of Update Rollup 5 for Exchange Server 2010 Service Pack 3 – KB2917508
Update Rollup 5 For Exchange 2010 SP3 (KB2917508) – Download
Exchange 2007 SP3 RU13:
Description of Update Rollup 13 for Exchange Server 2007 Service Pack 3 – KB2917522
Update Rollup 13 for Exchange Server 2007 Service Pack 3 (KB2917522) - Download
Friday, 14 February 2014
Modern Public Folder Migration
There is a lot of information and guides out there about ‘Modern Public Folder” migrations, this post is steps recorded during a live migration of a public folder from Exchange 2007 to Exchange 2013.
This blog is to a real world view of migrating public folders to Exchange 2013.
All steps\actions are from the TechNet Article
Preparation
Create two folders on your ‘Legacy’ Server called “PFScripts” and “PFMigration”, I choose to keep these on the root of the C:\Download the migration scripts:
- Export-PublicFolderStatistics.ps1
- Export-PublicFolderStatistics.strings.psd1
- PublicFolderToMailboxMapGenerator.ps1
- PublicFolderToMailboxMapGenerator.strings.psd1
Prepare for Migration
It’s recommend to take a snapshot of the current Public Folder deployment, run the following command to take a snapshot of the original source folder structure:
## Get Public Folder Structure
Get-PublicFolder -Recurse | Export-CliXML C:\PFMigration\Legacy_PFStructure.xml
Run the following command to take a snapshot of public folder statistics of the public folders:
## Get Public Folder Statistics
Get-PublicFolderStatistics | Export-CliXML C:\PFMigration\Legacy_PFStatistics.xml
Run the following command to take a snapshot of the permissions:
## Get Public Folder Permissions
Get-PublicFolder -Recurse | Get-PublicFolderClientPermission | Select-Object Identity,User -ExpandProperty AccessRights | Export-CliXML C:\PFMigration\Legacy_PFPerms.xml
If the name of a public folder contains a backslash “\” the public folders will be created in the parent public folder when migration occurs. Before you migrate its recommend that you rename any public folders that have a backslash in the name.
Locate public folders with a backslash in Exchange 2007 and 2010:
## Public Folder with “\” Exchange 2007
Get-PublicFolderDatabase | ForEach {Get-PublicFolderStatistics -Server $_.Server | Where {$_.Name -like "*\*"}}## Public Folders with “\” Exchange 2010
Get-PublicFolderStatistics -ResultSize Unlimited | Where {$_.Name -like "*\*"} | Format-List Name, Identity
If and folders are returned it’s recommended to rename them:
## Rename Public Folder
Set-PublicFolder -Identity <public folder identity> -Name <new public folder name>
Make sure there isn’t a previous record of a successful migration. If there is, you’ll need to set that value to $false. If the value is set to $true the migration request will fail.
## Check for previous migration
Get-OrganizationConfig | Format-List PublicFoldersLockedforMigration, PublicFolderMigrationComplete
If the status of the PublicFoldersLockedforMigration or PublicFolderMigrationComplete properties is $true, run the following command to set the value to $false.
## Change PF migration status
Set-OrganizationConfig -PublicFoldersLockedforMigration:$false -PublicFolderMigrationComplete:$false
NOTE: After resetting these properties, you must wait for Exchange to detect the new settings, This may take some time to replicate.
Prerequisites for Exchange 2013
Make sure there are no existing public folder migration request:
## Check Exchange 2013 for migration request
Get-PublicFolderMigrationRequest | Remove-PublicFolderMigrationRequest -Confirm:$false
Confirm there are no public folders on Exchange 2013:
## Check Exchange 2013 has no public folders
Get-Mailbox -PublicFolder
Get-PublicFolder
If public folders are returned, run the following command to remove them:
## Remove Exchange 2013 Public Folders
Get-Mailbox -PublicFolder | Where{$_.IsRootPublicFolderMailbox -eq $false} | Remove-Mailbox -PublicFolder -Force -Confirm:$false
Get-Mailbox -PublicFolder | Remove-Mailbox -PublicFolder -Force -Confirm:$false
Generate the CSV file for migration
On the legacy Exchange server, run the Export-PublicFolderStatistics.ps1 script to create the folder name-to-folder size mapping file:
## Generate CSV file for migration
.\Export-PublicFolderStatistics.ps1 <CSV File Name> <FQDN of source server>
Run the PublicFolderToMailboxMapGenerator.ps1 script to create the public folder-to-mailbox mapping file:
## Exchange 2013 Public Folder mapping
.\PublicFolderToMailboxMapGenerator.ps1 <Maximum mailbox size in bytes> <Folder to size map path> <Folder to mailbox map path>
i.e.
.\PublicFolderToMailboxMapGenerator.ps1 1GB PFStats.csv FolderToMailbox.csv
Copy the generated file to the Exchange 2013 server
Create the public folder mailboxes on Exchange 2013
Create a new public folder mailbox on 2013:
## Exchange 2013 new public folder
New-Mailbox -PublicFolder <Name> -HoldForMigration:$true
The migration I was working wasn’t very big, so I only required a single public folder mailbox, if you require additional mailboxes run:
## Exchange 2013 additional public folder mailboxes
$numberOfMailboxes = x;
for($index =1 ; $index -le $numberOfMailboxes ; $index++)
{
$PFMailboxName = "Mailbox"+$index; if($index -eq 1) {New-Mailbox -PublicFolder $PFMailboxName -HoldForMigration:$true -IsExcludedFromServingHiearchy:$true;}else{NewMailbox-PublicFolder $PFMailboxName -IsExcludedFromServingHierarchy:$true}
}
Public Folder migration
Legacy system public folders such as OWAScratchPad and the schema-root folder subtree in Exchange 2007 won’t be recognized by Exchange 2013 and will be treated as bad items. This will cause the migration to fail. As part of the migration request, you must specify a value for the BadItemLimit parameter. This value will vary depending on the number of public folder databases you have. The following commands will determine how many public folder databases you have and compute the BadItemLimit for the migration request.
## Get 2007 Public Folder
$PublicFolderDatabasesInOrg = @(Get-PublicFolderDatabase)
## Set Bad Items
$BadItemLimitCount = 5 + ($PublicFolderDatabasesInOrg.Count -1)
Start Public folder migration (Exchange 2007):
## Start Public Folder Migration – Exchange 2007
New-PublicFolderMigrationRequest -SourceDatabase (Get-PublicFolderDatabase -Server <Source server name>) -CSVData (Get-Content <Folder to mailbox map path> -Encoding Byte) -BadItemLimit $BadItemLimitCount
Start Public folder migration (Exchange 2010):
## Start Public Folder Migration – Exchange 2010
New-PublicFolderMigrationRequest -SourceDatabase (Get-PublicFolderDatabase -Server <Source server name>) -CSVData (Get-Content <Folder to mailbox map path> -Encoding Byte)
To check the migration has started, run the following command:
## Check public folder migration
Get-PublicFolderMigrationRequest | Get-PublicFolderMigrationRequestStatistics -IncludeReport | Format-List
Once the migration reached the AutoSuspended state as shown below, proceed to the next steps, otherwise you must wait as this may take some time based on your PF size.
Lock down the public folders on the legacy Exchange server for final migration (Downtime required)
On the legacy Exchange server run the following command:
## Lock Public Folders
Set-OrganizationConfig -PublicFoldersLockedForMigration:$true
Resume\Complete the public folder migration on the Exchange 2013 server, run the following command:
## Complete public folder migration
Set-PublicFolderMigrationRequest -Identity \PublicFolderMigration -PreventCompletion:$false
Resume-PublicFolderMigrationRequest -Identity \PublicFolderMigration
I found once I started the completion process the StatusDetail reported back as StalledDueToMailboxLock:
To get this started again I restarted the ‘Information Store’ on the legacy Exchange server:
The final status changes you should see are:
and
Test and unlock
After the final migration has completed, you should test to make sure the public folder hierarchy\permissions\content are correct, create additional folders and post content to folders to confirm folders are working.
To tell a mailbox to look at the new modern folders, run the following command:
## Exchange 2013 set mailbox to modern PF
Set-Mailbox -Identity <Test User> -DefaultPublicFolderMailbox <Public Folder Mailbox Identity>
Once test have been completed and you can confirm public folders are working as they should be, you can unlock the folders for the rest of the organisation, run the following command:
## Exchange 2013 Unlock PF’s
Set-OrganizationConfig -PublicFolderMigrationComplete:$true
Modern public folder migration complete !!!
Disclaimer: All scripts and other PowerShell references on this blog are offered "as is" with no warranty. While these scripts are tested and working in my environment, it is recommended that you test these scripts in a test environment before using in your production environment.